|
|
Post by kioskfan on Jun 7, 2017 19:26:25 GMT
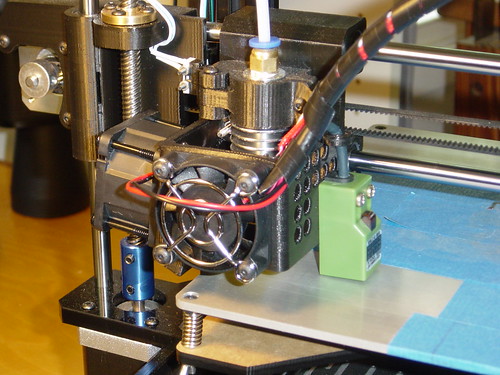
I know this has been covered a few times here but this is my try at fixing the problem. It is true that one of the most glaring problems with our printer is the deficient part cooling system. Sure you can produce parts in the stock state but you will get to a point where the buildup of heat within your part is going to damage that part. Most of my parts have been to repair other things and therefore what I needed was very small parts that print rather quickly and there seemed to be sufficient cooling up until now. Now that I'm starting to make the motor mounts that I bought the printer for my quality is dropping off and I need a solution. After looking at all the alternatives and reexamining the problem I wanted to try to start with a simple approach and I ordered myself a larger cooling fan thinking that if I just blow a bit more air at the problem it would go away but it was for not as I ordered the wrong damn fan. The fan I ordered was on the wish list of fans I "wished" would fit but didn't so it don't and I was stuck, still. Going over your contributions and fine ones they are but they all suffered from the problem of needing a fan I didn't have. Only DMS DP5 user Dimitar Tanchev (or mexusbg) from Bulgaria had the appropriate solution. His design uses two 40x40 fans and looks very close to the factory unit. He's made a number of designs for the DP5 and although I was unsuccessful in getting him to join our group he says he does visit here so I'll say hi and thank him here.  Here's a photo of my completed part with the new fan on the right. I'll let you know in about five hours how it works. |
|
|
|
Post by kioskfan on Jun 8, 2017 3:20:47 GMT
I just made a small print and it does look better than the last one I made yesterday, I'm doing a Benchy now. The fan sure is louder being about four times the cfm and all, the new fan is 40mm x 40mm x 28mm. I also had to add about 1/4" block to strike the limit switch to keep the fan from hitting the acme screw.
|
|
|
|
Post by kioskfan on Jun 8, 2017 19:48:54 GMT
Wow what a difference. I couldn't even print a benchy before. Link to my Benchy photos
 <a data-flickr-embed="true" href="https://www.flickr.com/photos/webweave/albums/72157684727001746" title="Benchy, second try"><img src="https://c1.staticflickr.com/5/4255/34796707410_ce795f7332.jpg" width="500" height="281" alt="Benchy, second try"></a><script async src="//embedr.flickr.com/assets/client-code.js" charset="utf-8"></script> |
|
|
|
Post by kristiank on Jun 11, 2017 15:15:38 GMT
Nice! What are the parameters that you used? Maybe you shoud decrease the accelerations jut a bit. It could reduce the ripples on the walls. Also do you use the "Auto bed leveling"-G29?
|
|
|
|
Post by kioskfan on Jun 11, 2017 19:40:05 GMT
Nice! What are the parameters that you used? Maybe you shoud decrease the accelerations jut a bit. It could reduce the ripples on the walls. Also do you use the "Auto bed leveling"-G29? Yes I've modified Cura to do the auto bed leveling (It was described in a post here). Seems to work fine but can you see something that shows otherwise? I'm just using the stock settings and haven't really modified anything except for the new fan. Where does one decrease the accelerations? |
|
|
|
Post by kristiank on Jun 12, 2017 15:58:51 GMT
I think these lines are happen when the Auto leveling is on. When the motors correct the hight. I've seen it on other benchys, so it might be somethink with the model as well. As for the accelerations you can change them in the printer's parameters. I reduced mine with one level and it seems to be fine. Attachments:
|
|
|
|
Post by kioskfan on Jun 12, 2017 19:47:08 GMT
I think these lines are happen when the Auto leveling is on. When the motors correct the hight. I've seen it on other benchys, so it might be somethink with the model as well. As for the accelerations you can change them in the printer's parameters. I reduced mine with one level and it seems to be fine. I'll manually level the bed and try one with auto-level off. Thanks Kristiank! |
|
antti
New Member

Posts: 16 
|
Post by antti on Nov 3, 2017 22:52:19 GMT
I started to think more of cooling system. I'm pretty sure that it would be most effective to lead all the air through the heat sink, not just about there when even most of the air might not do the cooling work. This picture here what is from this hypercube design www.thingiverse.com/thing:1752766 The fan holder is touching the heat sink and the fan is just 30mm (I think..) It's very light weight allso. Of course you must add other staf there like the other fan and sensor. Any idea would the 30mm fan be ok when used like this? I thought I would use some ready desing but I think want some this kind of heat sink touching system. Of course its easy to put just bigger fan to this kind of desing but dont know is there a need for that.  |
|
|
|
Post by 3dprintingmeathead on Nov 4, 2017 14:11:01 GMT
What you see there in the picture is an e3d heat sink cooling fan. It does a great job at keeping the cold end...cold. the stock cooler on the dp5 is a 40mm, the e3d is 30mm. There are also many clones of this part. Personally, I feel it's worth the money to buy an authentic one. A lot of these clones come with weak(although quiet) fans.
There is no need to go bigger than 30mm on this fan. This type of fan cannot build pressure, so to keep the air volume high, there must be little to no restriction in the airflow path. So a smaller fan with a clean path of airflow will move more air than a larger fan with an airduct. And with the hot end, the rule of thumb is the cooler the better.
Back when I swapped out my hot end, I tried one of those clip on hot end/part cooling fan ducts that used the stock 40mm fan. It moved the fan out and split the air directing half to the print and half to the part. It did neither well, and it also meant I was stuck with constant airflow over the part, so no petg/nylon/and for me. I do not recommend this route.
Speaking of different materials, there is another issue worth addressing if you ever want to play with those. If you look at the current airflow, the air is forced in, but does not have an easy out. It hits the x carriage and either goes up or down. This can cause warpage. If you check out the tornado hot end kit on thingiverse(and the press if I remember correctly) there is an exit air duct that sends the air up and away from the print. This is a very good idea to try to implement as it will leave you with a more capable printer in the long run.
|
|
Jason
New Member
Posts: 17
|
Post by Jason on Nov 5, 2017 1:29:14 GMT
Jumping in, Meathead correctly pointed out that when I receive my genuine fake E3DV6 Hotend they would be shorter than the DP5 stock, and they are. I'm playing around with a new X-Hotend Carriage based on the clip on 30mm fans. Looking at adding another fan, moving the bed level sensor to the back (still processing this though, so not convinced it's an improvement, more so a necessity ). I'II post photographs when completed and tested. Out of interest, I never had any real issues with the stock DP5 fan configuration, with excellent print quality complimented with settings etc. of course.  |
|
|
|
Post by 3dprintingmeathead on Nov 5, 2017 1:47:03 GMT
It'll be hard to move the sensor to the back, there just isnt a lot of clearance back there currently. I think you will have to design a new x carriage, one with 3 bearings, ad justify the sensor to one side. Also, you will have to lower the mounting holes substantially, even lower than what you would have to to get the shorter hot end to work. Make sure you leave room out the top of the sensor for the wire strain relief. In my honest opinion, the spacing of the x guide rails is the same as a prusa, so I'd check out thingiverse for the virtually endless x carriage and hot end mount designs for an e3d Bowden for a prusa. This will let you adapt so much easier to a standard bolt spacing instead of custom building anything you need when you decide to upgrade.
|
|
Jason
New Member
Posts: 17
|
Post by Jason on Nov 5, 2017 2:15:44 GMT
Design intent will use existing mounting holes to mount the 'fan bracket' and using pemserts/nutserts/threaded inserts, everything here will fit. Sensor to the back, I have room with the concept I have in mind, that's not the concern at this stage - what is would be the function. I already have the new hotends, CAD to scale as viewing. Real checks will be in the prototype as we all know. .   ![]() Attachments:
|
|
antti
New Member
Posts: 16
|
Post by antti on Nov 6, 2017 21:12:06 GMT
|
|
mirek
New Member
Posts: 16
|
Post by mirek on Nov 10, 2017 10:41:54 GMT
Have a look at my design here: dp5.boards.net/post/477/threadFits the original carriage and uses one radial fan, gives a lot fo air flow and lots of air pressure... Have great print results so far. |
|


 Why this desing wouldnt work or how to make it better?

